Sunday 31 December 2017

Happy New Year Trinket Box

Happy New Year! 
I'm not one to make (or keep) resolutions but this week I'll be sharing to projects 
that will (I hope) help me keep 2 of my resolutions.  
My first resolution is to take a moment each day to reflect on something 
I'm grateful for and to write it down. 

- My first project - 

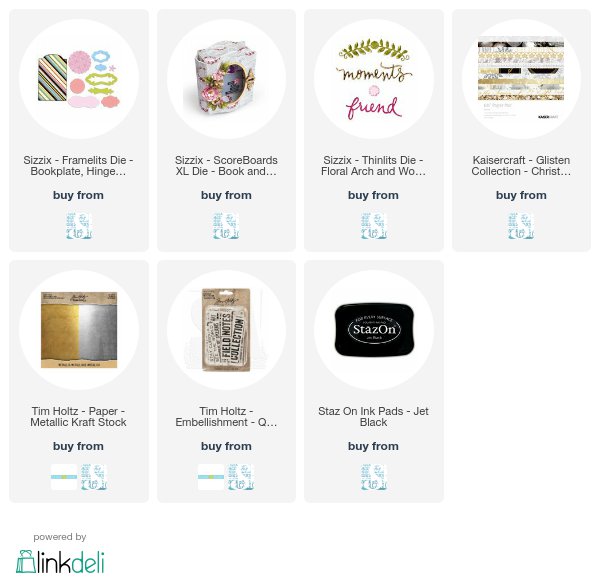
I recently received 3 new Sizzix dies - the Trinket Box (662360);  Bookplate, 
Hinges & Label (662356); Floral Arch & Words (662357) - all from designer Eileen Hull.
I die cut out the pieces for the trinket box using mat board, black cardstock and pattern paper from the Kaisercraft Glisten Collection.

I created a shaker box for the window using the bookplate die (662356) 
I used the same die to cut out 2 pieces of craft foam. The background of the shaker box is Gold Kraft-Core. I then filled my shaker box with silver stars and a couple of different kinds of chunky gold glitters. It's all very sparkly. I topped it off with a piece of acetate then attached it to the inside of the box cover.

Here is the inside of the front cover and the back of the shaker box.
The quote chip is layered over two pieces of  metallic kraft-core die cut with the label die from the Bookplate set (662356).

I made 3 accordion booklets for my trinket box.
I took 3 strips of white cardstock - 3.75" x 12" and scored them at 3", 6" & 9". 

To finish off the front of my box I die cut 2 floral arches (662357) from Gold Kraft-Core.
I took an enameled tag and stamped 2018 on it using black Staz-On. I glued 2 metal washers to the back of the tag before attaching it to the front of the box. A loop of elastic cording
 holds my box closed.

Click on the video below to see a video of the project.


Wednesday 27 December 2017

Twist & Pop Card - Scrap Shotz Blog

I am back on the Scrap Shotz Blog today and I am sharing a twist & pop card.

Head over the Scrap Shotz Snap Shotz Blog for all the details, products used and a video.


Sunday 24 December 2017

Merry Christmas & Happy New Year!

I just wanted to take a few minutes to wish all of you a very 
Merry Christmas & a happy, healthy & crafty 2018.

I have an art journal page page I created to celebrate the season -
 I used the Home For The Holidays Paper Pack from Wild Whisper Designs.

I absolutely love the pattern paper from Wild Whisper. It's heavy weight makes it
durable for mixed media which I love. Each pack come with 6 sheets of double sided paper and the designs are fresh and unique.
Look below for a complete list of products I used to create this page.


Click below to watch how I created this page:

Watch for more inspiration from me for Wild Whisper as I will joining their 2018 Design Team.


Products Used:
(This blog uses affiliate links that earn me a small commission at not extra cost to you)

Wild Whisper Designs:
Home For The Holidays Paper Pack

Home For The Holidays Stamp Set

Thursday 21 December 2017

Christmas 1956 - Scrap Shotz Snap Shotz

Merry Christmas!

I am on the Scrap Shotz Snap Shotz Blog today sharing a 12x12 layout I created using product available at the online store.

Check out all the details here.


Monday 18 December 2017

The Perfect Blend

Ah, the delicious smell of coffee when heating embossing powder. 
Wait. What?
Yes, you heard me right. Kim, the creative genius behind the embossing powders of Emerald Creek Craft Supplies has brought together a perfect blend of gorgeous java colored embossing powder and the yummy scent of fresh brewed coffee. She's has called it Just Java and it's addictive. This embossing powder will be available on January 20th. Ask your local retailer to carry it or order it directly from Emerald Creek.

I recently created a card for a friend who shares my love for a great cup of coffee and I couldn't resist using this Just Java embossing powder.


To see how I created this card you can check out the video on YouTube
Products Used:
This blog uses affiliate links that earn me a small commission at no extra cost to you

Just Java Embossing Powder - available January 20, 2018

Creative Scrapbooker Magazine:

Stampin' Up!
Perfect Blend Stamp Set


Thursday 14 December 2017

Emerald Creek Craft Supplies & Stencil Girl Blog Hop

Hello blog friends!
Today I am very excited to be participating in a blog hop with 
One lucky winner will receive a $25 Gift Certificate to StencilGirl Products
AND a $25 Gift Certificate to Emerald Creek!
Enter to win by leaving a comment below.
Then be sure to visit the other blogs in the hop and comment to win.
The more blogs you comment on, the more chances you have to WIN!
One winner will be chosen at random from all blog comments!
(One comment per blog please.)
You have until Tuesday, December 19th at 11:59PM Central Time to leave your comments.
Winner will be announced on
StencilGirl's Facebook page on Wednesday, December 20th.

Now lets get to my project.
I created an art journal page - there are lots of layers and yummy textures.

I started with a sheet of kraft mixed media paper from the Dylusions Large Journal and sprayed Distress Spray Stain through the Be Free stencil.

Next I added some torn paper pieces from an old book. I adhered these with matte medium & dried it completely before moving on to the next layer.

My next step was to add some acrylic paint with a brayer - leaving some white space.

After making sure the paint was dry I added molding paste through the Corrugated Lines 
& Urban Insiders stencils. I left this to dry on it own. I love how the Distress Stains seep up through the paste as it dries.

After the molding paste was completely dry I added some gesso by dry brushing on - just in random spots. I them brayered on some purple acrylic paint over the molding paste to highlight it a bit.
To create my focal point I applied some Black Soot Distress Oxide through the Swallows stencils on to a piece of white cardstock. I then cut these out to use on my journal page.

I then pressed my Spiced Marmalade Distress Oxide pad across the Urban Insiders stencil, spritzed with some water then laid it over cardstock. I did this a few times because I wasn't sure how many I wanted to use. Once these were dry I tore them out and inked the edges.

I used the Be Free stencil for the main part of my page.
First I fixed the stencil to a piece of cardstock then applied some Distress Oxide through the stencil with a blending tool. 

Next I used the mask of the stencil to add Black Soot Distress Oxide for the letters.
To fill in the white spaces left by the stencil I used my water brush. I then trimmed this out.

Now back to my page - I sprinkled some Burnt Copper Leaves embossing powders randomly over the page and heated it from underneath.
Next I assembled the pieces of my focal point and adhered them with white glue.

One last step to finish page - I added some Wilted Violet & Black Soot Distress Oxide to the edges.
My page is now complete and ready to be added to my art journal.

Be sure to check out the designers from Day 1 of our blog hop and leave 
your comments for a chance to win the giveaway!
December 13


December 14
Julia Chupik ------> you're here!
Check back tomorrow for inspiration from these fabulous designers

December 15

Products Used:
(This blog uses affiliate links that earn me a small commission at no extra cost to you. Thank you for your support!)

Emerald Creek Craft Supplies:


Wednesday 13 December 2017

Leave A Little Sparkle - Distress Oxides + Perfect Pearls

Hello everyone!
I am back and ready to share a card I made for a friend. 
I have included a link to the YouTube video for this card as well.

~Here is the finished card~
I love using Perfect Pearls Pigment Powders with the Distress Oxides.
The little bit of shimmer looks lovely against the matte finish of the inks.

YouTube Video Link:


Products Used:
(This blog contains affiliate links that earn me a small commission when used to purchase products.
These links do not cost you any extra. Thank you for your support)

Monday 11 December 2017

Letterpress Christmas - Altered Decor

Hello and happy Monday!

I'm sharing a set of altered letterpress words that I bought from the local $ store.
They were plain wood when I bought them but I stained, painted and distressed them to get some wonderful new pieces to add to my holiday decor.

I also have a Youtube video so you can watch me create these.

Products Used:
(This blog uses affiliate links that earn me a small commission at no extra cost to you. 
Thank you for your support)