Thursday, 31 August 2017

More Cowbell!

I have blogged!
This situation clearly calls for more cowbell!
 I found this fun stamp set from Neat & Tangled at my LSS Scrapendipity.
It made me laugh as soon as I saw. The iconic Saturday Night Live skit is a 
favourite of mine and my husbands.I knew it would be perfect for his birthday card.


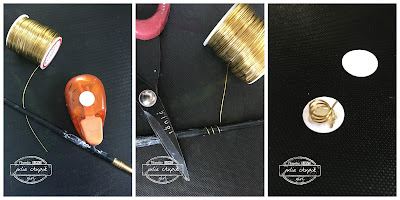
I wanted the cowbell to have some movement so I fashioned a 'wobbler' our of a wire and cardstock.
I took my wire and twisted it around the handle of a paintbrush 3 times then glued a cardstock circle onto either end. 

For my background, I started with a piece of cardstock and began blending my Distress Oxides in a circular pattern starting in the centre.

I used the Rays Layering Stencil from Tim Holtz and Fired Brick Distress Oxide to frame my cowbell. The cowbell was stamped on watercolour paper and coloured with Distress Markers then mounted on my DIY wobbler and adhered to my card.

There you have it.....more cowbell!

Tuesday, 29 August 2017

Halloween + Etc Tag

Hello! I am so happy to be sharing a Halloween project that has been published in the 


I started with a small Ecetera tag that I had painted with gesso +and applied molding paste through the woodgrain stencil. (Sorry no pics).

Once the paint/molding paste was completely dry I used Distress Paints in various brown tones: Ground Espresso,Vintage Photo, Black Soot & Walnut Stain.
I dry brushed over the surface of the tag until I was happy with it. To finished off the tag I added some script stamping with Archival Ink in Potting Soil

To create my focal point I first took a piece of watercolor paper and Distress Oxide Inks in Spiced Marmalade, Fossilized Amber & Vintage Photo.
I used the largest die from the Stitched Rectangle Thinlit die set to die cut out my background frame.

The image of the 4 boys holding the pumpkins is from the Found Relatives Occasions set from Tim Holtz Idea-logy. I gave it a very light sanding to add some distress, coloured the pumpkins with my Spiced Marmalade Distress Marker and added some Ground Espresso ink with my Tim Holtz Spritzer Tool.

It was time to start assembling my tag!

I stamped some pumpkins on the scraps of Distress Oxide watercolor paper I had leftover and layered these over the Twisted Edge die cut.  A page torn out of an old book that I inked up and stamped a spider on made a another layer. I added some Halloween Rub-Ons to my tag as well.

I found this pumpkin in my stash - its from the Tim Holtz Idea-ology Oddities & Charms set that made the perfect addition to my  focal image. All I did was use my Spiced Marmalade Distress Crayon to add some colour.


I am an affiliate to Scrap 'n Stamp and Scrapbook.com and may receive a small commission, which in no way affects the price you pay but it allows me to work from home. I only recommend products & retailers that I trust & believe in. Thank you for your support!!

Products Used:
Etcetera Tag - Small
Golden Molding Paste
Liquitex White Gesso
Tim Holtz/Stampers Anonymous Layering Stencil: Woodgrain
Tim Holtz/Stampers Anonymous Stamp Set: Carved Halloween
Tim Holtz/Sizzix Thinlit Dies: Twisted Edge; Stitched Rectangles, Mixed Media
Tim Holtz Idea-ology Remnant Rubs: Gothic Halloween; Found Relatives Occassions; Oddities, Adornments & Charms pack.
140lb Cold-Press Watercolor Paper

Tools Used:
Tim Holtz Spritzer Tool
Big Shot


Tuesday, 1 August 2017

Monarch Thank you Card

Welcome back! It's been a quiet summer in my craftroom but I 
managed to sneak in a few moments to make this Thank You card.


I started with a favourite stamp set - Botanical Sketch and a new stamp set that I am sure will be a 
forever favourite - Flutter. 

I started by blending the Fossilized Amber Distress Oxide over a 5" x 5"  heavy white cardstock, then blended Spiced Marmalade Distress Oxide only along the edges. I then went back with the Fossilized Amber and blended the colours together.  Next I used my Misti to stamp the Botanical Sketch image on to the background. 

I used Fired Brick Distress Oxide on the stamp and spritzed it with a bit of water. I let the stamp sit on the paper for about 30 seconds. I stamped my sentiment and the monarch butterfly with embossing ink and used fine detail black embossing powder.

I used some Distress Inks to colour my stamped image before using the coordinating framelit to die cut out my image. Yippee for no fussy cutting!

My butterfly needed his antennae so I decided to create my own with wire, my heat tool and black embossing powder. I used my heat tool to heat the wire and dipping it in the jar of the embossing powder. 

I did this several times until the wire was covered. I gave the wire one final blast while pointing the wire down so that the melting powder would pool at the tip of the wire. Voila! Butterfly antennae!

All that was left to do was adhere my butterfly to the card.