Showing posts with label Ken Oliver. Show all posts

Tuesday, 23 January 2018

Happy Everything Card

It's Monday and time for another card.

Over the holidays I did some stamp re-organizing and I came across an old favorite from 
Deep Red Stamps. I love this set of butterflies and decided they needed to see the light of day again.
I have included a link to the process video I  made while making this card.

~~Here is my completed card~~
I used a piece of acetate to apply the Color Burst pigments to the base and a watercolor brush to apply more Color Burst to the butterflies.


Products used:
(this blog uses affiliate links that earn me a small commission at no extra cost to you.
Thank you for your support.)

Deep Red Stamps:


Monday, 15 January 2018

Bird In My Journal - Birthday Card

Hello my crafty friends!
I am back with a couple of birthday cards to share with you 
using a beautiful stamp from Carabelle Studio.

~~Here are the 2 completed cards~~
I used a pretty simple watercolor background for my stamp. 
Some Yellow Gold Liquid Metal (Ken Oliver) was added for a bit of shimmer.

I masked the oval on one of the cards when stamping the bird image (above) except
 for the tail portion.


These were pretty simple and fast cards to make. In total it took 30 minutes to complete both.


Products use:
(I use affiliate links that earn me a small commission at no extra cost to you. Thank you for your support)

Carabelle Studio:
Un Oiseau Sur Mon Journal

Saturday, 7 October 2017

World Cardmaking Day 2017

Hello and welcome to my blog!
Today is World Cardmaking Day and I decided to participate.

I recently purchased this beautiful background stamp from Scrap Shotz.
 It's called Magnolia Fields and it's from The Ton Couture Cling Stamps

 I started by stamping my image on cold press water colour paper with Versamark Ink.
I embossed it with Pastel Lilac Embossing Powder from Emerald Creek Craft Supplies.

To  color my image I used Ken Oliver Color Bursts in Orchid, Lime Green and Ultramarine Blue.

I used my Tim Holtz/Sizzix Stitched Rectangle Die and cut out a portion of my stamped image. I adhered this to a piece of dark purple cardstock then attached this to my folded cardstock base.

My sentiment was stamped on a piece of scrap watercolor paper.

Products used:

The Ton Background Stamp - Magnolia Fields
Ken Oliver Color Burst: Orchid, Lime Green, Ultramarine Blue
Emerald Creek Craft Supplies Pastel Lilac Embossing Powders
Tim Holtz/Sizix Stitched Rectangles Die

Thursday, 23 February 2017

Botanical Card

Welcome to my blog!
Today I am sharing a card that was selected to be published in the current issue
of Creative Scrapbooker Magazine. I was thrilled as this was the first time
I had a project published in this amazing magazine.

I was inspired by the Tim Holtz Botanical Sketch stamp from Stampers Anonymous.

I started with a piece of cold-pressed watercolour paper that was larger than my stamp.
I stamped and embossed my image with clear, fine detail embossing powder.
Before I moved on to next step I tore post it note into a rough circle to mask off the centre.

Next I took my Color Burst Pigments from Ken Oliver and sprinkled these over the embossed image.

A few sprites of water and the pigments burst to life. I love this!

I removed the mask and used a watercolour brush to fill in the centre with Yellow Ochre Color Burst.

I dried the background with my heat tool before stamping 'Mom' on to the front the card.


Thursday, 5 January 2017

Northern Lights Card

Happy New Year, my crafty friends!

Resolutions. Love 'em? Hate 'em?
I'm kind of indifferent, I guess. 
However, I decided that to really ramp up my creative juices in 2017
that I need to make an effort to enter more challenges. 

So this blog is a project for  Creative Carte Blanche and their 
January Art Challenge - Baby, It's Cold Outside.

I decided to make a card using a 'new to me' technique - salt!
I wanted to create a wintery Northern Lights feel.

I started with a 6"x 4" piece of 140lb watercolour paper, Turquoise Color Burst,
large watercolor brush, a salt shaker and clean water.

First, I took my brush and brushed some clean water in a square on the
watercolor paper. I gave the water a few seconds to sit then I sprinkled the
Colorburst over the wet area.
I used the brush to push the color around the wet area.

After sprinkling on some salt I let the card dry. 

After the card dried I brushed away the salt. I loved the effect!

I used my Misti to stamp a tree line image over the ColorBurst. I love the Misti for stamping
on watercolor paper since I can stamp it multiple times and get a nice image.

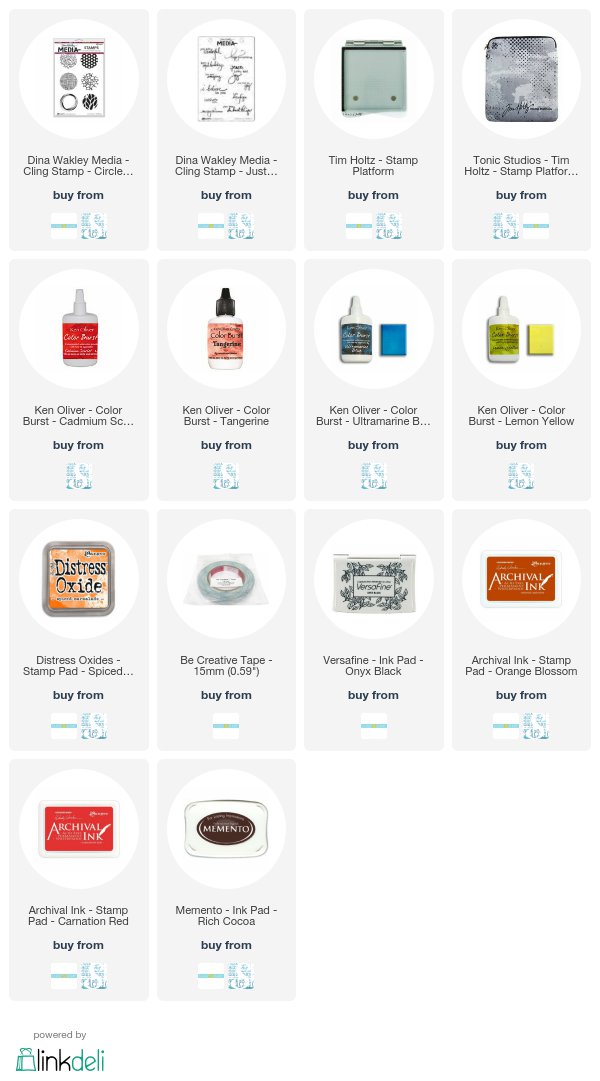
While the ink was still wet I embossed the image with fine black embossing powder.

To add a snowy effect I stamped with the halftone stamp and clear emboss-it.
I sprinkled Soft Fallen Snow embossing powder from Emerald Creek & then heat set.

~Finished Card~


Challenge Submitted:


Wednesday, 14 December 2016

Watercolour Christmas Card

Hello friends! I am here today to post a quick Christmas card I made this week.
December kind of snuck up on me and I had to get a dozen cards Christmas made and mailed in about 24 hours. 

I had found some inspiration on Pinterest - check out this gorgeous Christmas Tree card from Branch Studio.

Here is one of my finished cards:

I knew that if wanted a dozen cards done as quickly as possible that painting a tree with watercolour freehand was not going to work - I'm too much of a perfectionist. 

I decided to use my Mini Woodland Stencil from Tim Holtz/Stampers Anonymous and Color Burst in Pthalo Green. I used some painters tape to tape off the stencil image that I wanted to use.

I sprinkled a little bit of the Pthalo Green powder over the image.

A couple sprays of water and those gorgeous blue/green colours just come alive!

After removing the stencil I took a fine brush and  pushed the colours around until I was happy with it. I love this technique because every card turned out a bit different.

After the tree dried I added some grey paint to look like snow & shadows. Then splattered the cards with blues, yellows & reds.

A couple hours later and I had a 16 backgrounds ready to be made into cards.


Wednesday, 16 November 2016

Peace ---- A Wild Whisper Christmas Card

I am so excited to be participating in a blog hop for Wild Whisper this week. 
Watch for the blog hop to go live at 6pm MT on Friday, Nov 18.

However, I was so inspired by this beautiful new paper that I decided to make a Christmas Card to share with you today. 


I started by trimming a 4"x 5.25" piece from this 12x12 design from the Holiday Style Paper pack. 
After rounding the corners, I sprinkled a bit of Pthalo Green Color Burst Powder
 & misted with some water.
The paper curled a bit but held up really well with the moisture.

This piece is a 3"x 4" card from the Holiday Style Card Collection. I rounded the corners and used my ink blending tool to apply some Cracked Pistachio Distress Ink to the edges.

Next I used the Stacked Snowflake Die from Sizzix to cut out some snowflakes in the Holiday green deco sheet. I also trimmed out one of the banners from another 3"x 4" card.

I added a pop of colour by cutting out the word PEACE from a piece of Holiday Red Deco sheet with the Holiday Handwritten Thinlit set from Sizzix.