Showing posts with label Stamps. Show all posts

Saturday, 15 July 2017

Celebrate......Botanicals & Distress Oxides

Hello & welcome!

I'm here to share a card I made to give to my grandma who is turning 90 years young next week.
She is an amazing woman and I am so happy to be able to be with her on her special day.

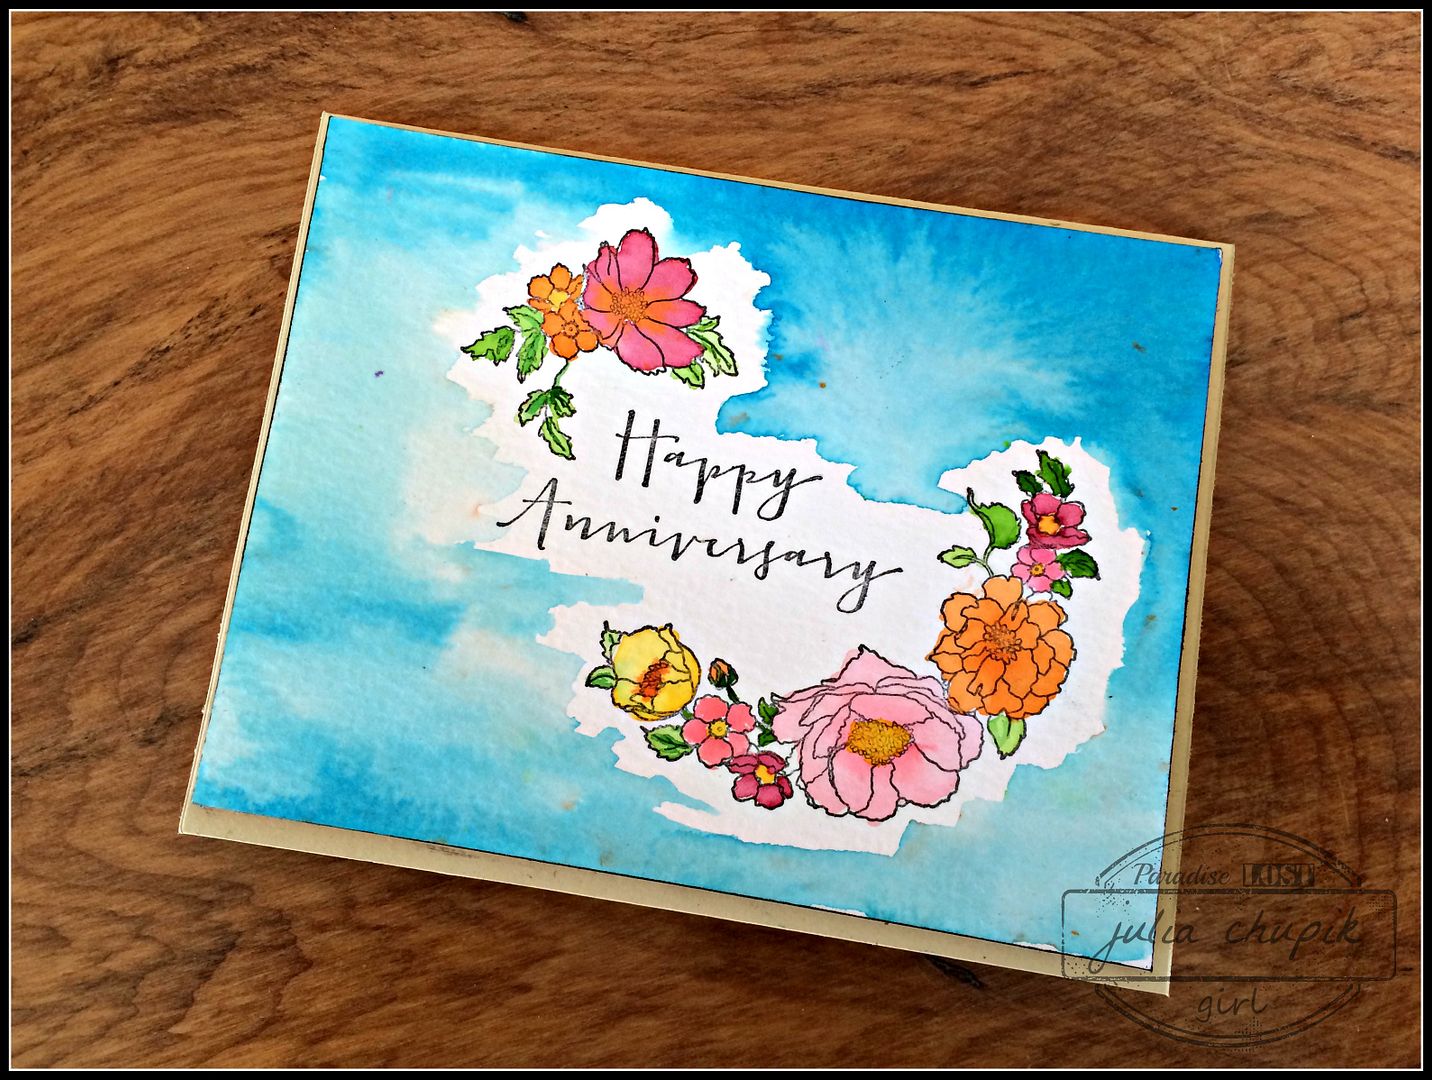
Here is the finished card


For this card I used the Flower Jar Stamp Set with matching framelits, Distress Oxides, Archival Ink and watercolor paper.

I started by applying my Distress Oxides on to my splat mat (which is actually a bbq mat I bought at the $ store) then I gave these a spritz of water. Next I took my 5"x 5" square of watercolor paper and began creating my background. 

To create an edge or frame for my card I swiped just the edges through the leftover ink on my craft mat. Normally I would use my blending foam applicator to do this but this was a happy accident on one edge. I loved it so much I did the same on the other 3 edges.

Here is the background

I needed something to help ground my focal point to the card so I took a stamp from the Tim Holtz Mixed Media 2 stamp set to create this loose crosshatch on my background.

I used some scraps of watercolor paper that I had on my desk to create the mason jars.
I love my Misti. I get perfect placement and a sharp, crisp stamped image every time.
I used the Flower Jar framelit set to die cut out my jars. Its hard to see in the photo but I also applied some glossy accents to the jars to give them some highlights.

To create my flowers, I first took some scrap watercolor (again!) and applied some Distress Oxides using the same technique as described above. I then stamped my flowers (using my Misti) then die cut these images out using the coordinating framelits.

It was time to stamp my sentiment and assemble my jars. I used pop dots for the jars then used liquid glue to tuck my flowers in behind the jars.
Products used:

Tim Holtz Flower Jar Framelit set from Sizzix
140lb cold press water color paper
Archival Ink - Jet Black


Friday, 19 August 2016

Technique Remix Time - August

I can't believe it's been a month since my last blog post! It's been a great summer but now it's time to get back in the craft room. Before I start working on Creative Chemistry 103 I wanted to get my tag for Tim's Technique Remix Challenge for August done. 

Check out Tim Holtz's Tag here.

Here is my take - I decided to go for a shabby garden look.

Before I did the Brayered Stain technique I stamped an image from the Mixed Media 2 stamp set from Stampers Anonymous. I used Old Paper Distress Paint to stamp it on to my tag.

I chose 3 Distress Stains to brayer on to my tag next - Victorian Velvet, Bundled Sage & Spun Sugar.

I just love how the Distress Paint stamped image resists the stain.

Before adding my elements I used my round blending tool to add some Bundled Sage Distress Ink to my tag. I forgot to take a photo of that step.

I used the Lattice Framework Die for the next technique. I die cut using chipboard for the main part and some pattern paper, cork & canvas for the insets. 


My flowers were made by layering two die cuts (one cardstock & one patterned paper) from the Tiny Tattered Florals set. I like the fuller look of the flower that this gives me.

I adhered a sentiment from the Casual Talk sticker pack before layering my Tint Tattered Floral over some Garden Greens die cut.

The theme for my take was inspired by the Shabby Garden Mood Board over at the Anything But Cute challenge blog. The mood board reminded of my grandma's garden on the farm but especially her lovely pink roses. 


Challenges Entered:


Monday, 8 February 2016

1 Background.4 Cards.Valentine's Day Edition

I'm back with another quick background that I made into 4 cards
especially for Valentine's Day.


This one I made especially for my husband - this year will be our 25th Valentine's Day together.
I truly believe that our love has made many impossible situations possible. 

Ok - enough of the sappiness let get on to the craftiness!


My base is a 9x12 sheet of 140lb cold press watercolour paper that I dragged through 4 Distress Stain Colours that I smooshed on to my splat mat and spritzed with water.
Once I was happy with the result I dried my paper and trimmed it down to 4 card fronts.


For these 4 cards I used the Collaged Hearts stamp set from Dina Wakely, the Urban Chic stamp set from Tim Holtz/Stampers Anonymous, and the script "Love" stamp from Stampin' Up!.


While rummaging through my stash I found this 'LOVE' stamp - its almost 2" tall and completely awesome! After I stamped it I used a white paint pen to outline one side of the word and then I used my Hickory Smoke Distress Marker on the other side, 
I just love how it makes the word pop off the background.


Thanks so much for visiting my blog today! 

I would like to submit this to the following challenges:

Saturday, 9 January 2016

Koi Pond - CHA...We are on our way with Emerald Creek Crafts!

Today is the first day of CHA in Anaheim and Kim ~ owner of Emerald Creek Craft Supplies ~ and Nicole of Nicole Wright Designs are at the big show showing off their exciting new products. 

I am absolutely out of mind excited to share my first CHA project.
Emerald Creek Craft Supplies has two brand new set of stamps designed by
  Nicole Wright under the brand Nicole Wright Designs.
One is called Fallen Blossom and is a set of 5 cling stamps. The other one (used on my card)
is called Upstream and comes in a set of 6. They are beautiful!

I was inspired to make a bendy fold card using the Koi images.
There are lots of tutorials for Bendy Fold Cards on Pinterest ~ I used this one
from SplitCoast Stampers.

My card base was cut from 100lb cardstock from Emerald Creek in white then covered in a pattern paper I had in my stash. Once my card was assembled it was time to start decorating with my stamped images and accessories

My Koi images are all stamped on cold press watercolour paper and coloured with a small paint brush and Distress Markers.

I added a few of the small Koi images to my card as well ~ a few hiding away in the greenery.
The greenery is diecut from the Garden Greens die from Sizzix and then stained with Peeled Paint.


The sentiment is from the Stuff To Say set from Stampers Anonymous Tim Holtz Collection.
I first stained a piece of watercolour paper with Abandoned Coral before stamping my sentiment with Black Archival Ink.


I added some gold foil along the edges to add a bit of interest.
I just love all the layers created when the card is slotted together.


Here is my finished card ~


Thanks for visiting my blog today! Please came back tomorrow to see
 another CHA project I designed for Emerald Creek.

Be sure to visit the rest of the Emerald Creek DT blogs for more exciting CHA projects!

Karon Hughes

Come join us over at the Emerlad Creek Dares blog and share in our NEW Adventure!
We want to see what you are making with your NEW Christmas presents,NEW purchases, NEW techniques, NEW CHA stuff even if you are one of the lucky few to have yours right away.


Wednesday, 30 September 2015

Not ready to say goodbye to summer....

It's true. I love summer.
The long, warm days. Flip flops. Shorts & Tank tops.
I love that.

Don't get me wrong...Fall is beautiful too but fall is sometimes short-lived season in these parts of Canada. It could snow any day now and I am definitely not ready.

Which brings me to these cards I made last week on the first day of fall. Initially, I was just making an anniversary card for my in-laws and decided to use my Peerless Watercolor's & the Timeless Love set from Stampin' Up!
 I was really happy with the way it turned out and had a craving to make some more cards.
I went to YouTube for inspiration and found the lovely & talented Nicole of Scraps & Stamps
Her video tutorials are awesome! Her most recent video using Distress Inks & Color Burst  has me wanting to go out and buy the whole line of Ken Oliver Color Burst products immediately! 
Thanks, Nicole!

 The Blended Bloom stamp from Stampin' Up! worked really well.
The image was first stamped with Versa Mark then 
heat embossed with superfine white embossing powder.

I used the same stamping technique with this card using the 
Flower Garden set from Tim Holtz & Stampers Anonymous.
I decided to leave the background white for a softer feel.


I love the butterfly from the Tim Holtz/Stampers Anonymous Perspective stamp set 
and just had to try it with this technique. I love it and I already have 
several colour combo's I want to try.

Thanks for visiting my blog today! I really appreciate all your comments.


Friday, 25 September 2015

Live Your Dreams......

My son's birthday was last weekend and since he is off at college
there is no better gift than gift cards for coffee shops, the local grocery store, 
gas for his car & clothing stores. 

There is no cooler way to give a bunch gift cards than in an Eileen Hull 3D Square Box. 
I love this die! I have used it often to make a gift box, a storage box for small doo-dads and even a box for a custom made advent calendar.

This project was all about my son so it had to be manly, gritty & grungy.

This box has it all - The Time Travellers from Tim Holtz & Stampers Anonymous, tinted sand texture paste from DecoArt Media, lots of Distress Inks and a few bits and bobs from my stash. 
My favorite part is the Edison Bulb Charm from Emerald Creek Crafts .


 I made matching gift card holders from card stock to put in the box. I love the look of the torn notebook edge that fold over and is secured behind a brad.

Don't forget to check out the Emerald Creek Dares blog for this months challenge and for your chance to win a $25 gift certificate to their online store!

http://blog.emeraldcreek.ca/2015/09/we-dare-you-to-enter-80s-re-purposed.html
http://www.emeraldcreek.ca/


Have a wonderful weekend and thanks so much for stopping by my blog today.


Wednesday, 23 September 2015

The 1980's.....those were totally tubular times!

It's almost time for the 
and this years theme is Celebrate The '80's
Ah....the '80's. The big hair, leg warmers, fingerless gloves and shoulder pads.
Those were good times, weren't they?
The Emerald Creek Dares DT were given the task of designing projects for the  Emerald Creek Crafts Supplies booth for Carnival and I couldn't think of any better way to get inspired than by listening to
top hits of the '80's by Canadian artists. 

Seriously, how can you NOT be inspired when listening to Echo Beach by Martha & The Muffins. 

Or how about The Glass Tiger classic - 'Don't Forget Me When I'm Gone. 
Patio Lanterns by Kim Mitchell was always a favorite tune to play on the tape deck
I have to say that the most iconic song for the 80's to me was Summer of '69 by Bryan Adams
Well, I'm off to tease my hair high & knit myself a pair of neon pink leg warmers!

Check out the Emerald Creek Dares blog for more totally tubular '80's project for the rest of the DT.
http://blog.emeraldcreek.ca/ 
http://www.emeraldcreek.ca/

Thanks for visiting my blog today!
~~~stay crafty~~~