Showing posts with label Thinlits. Show all posts

Friday, 3 February 2017

Cherish Moments - Mixed Media Layout

Welcome to my blog!
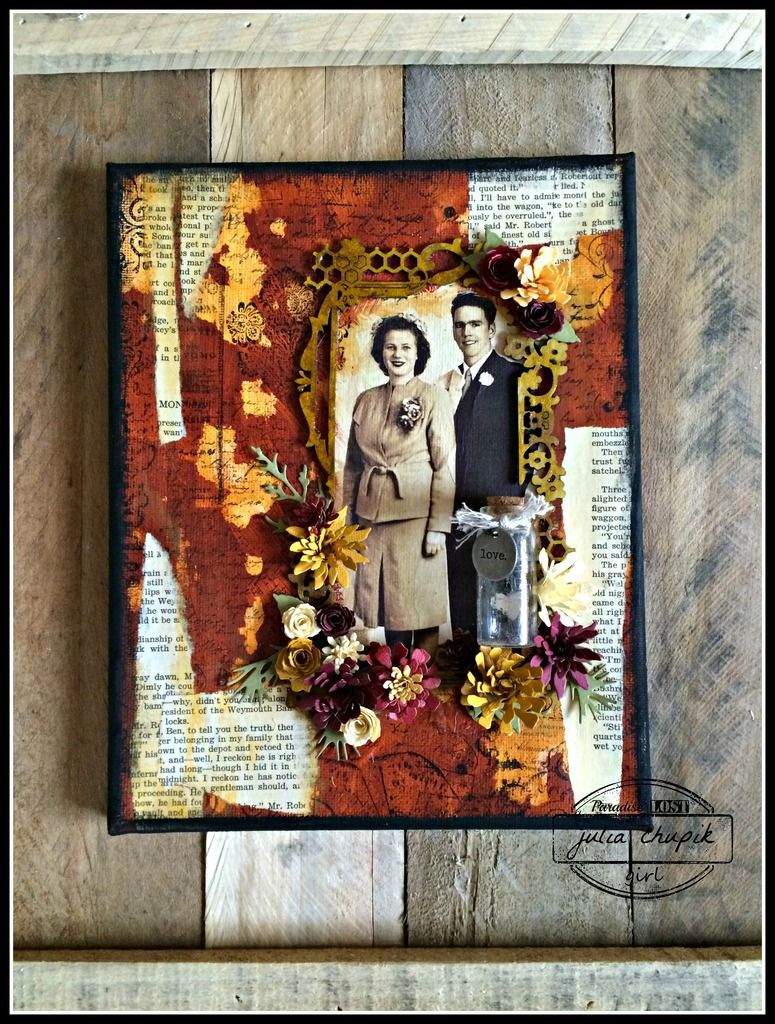
Today I'm here to share a 12x12 mixed media layout I created for The Scrap Shack.
The Scrap Shack now carries a selection of chipboard from Southern Ridge Trading Co.

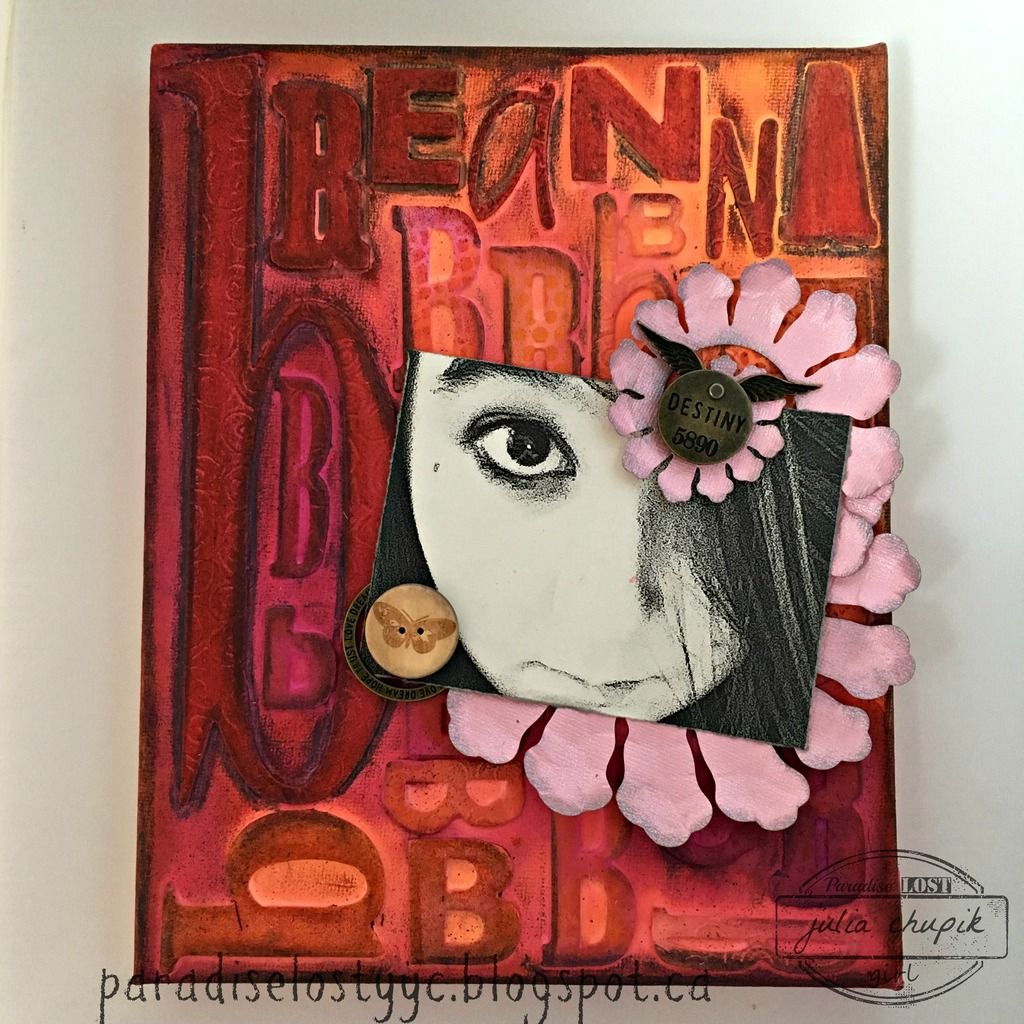
I created this layout with a couple of Southern Ridge Trading Co chipboard die cuts;
some discontinued papers from my stash in reds & browns & a
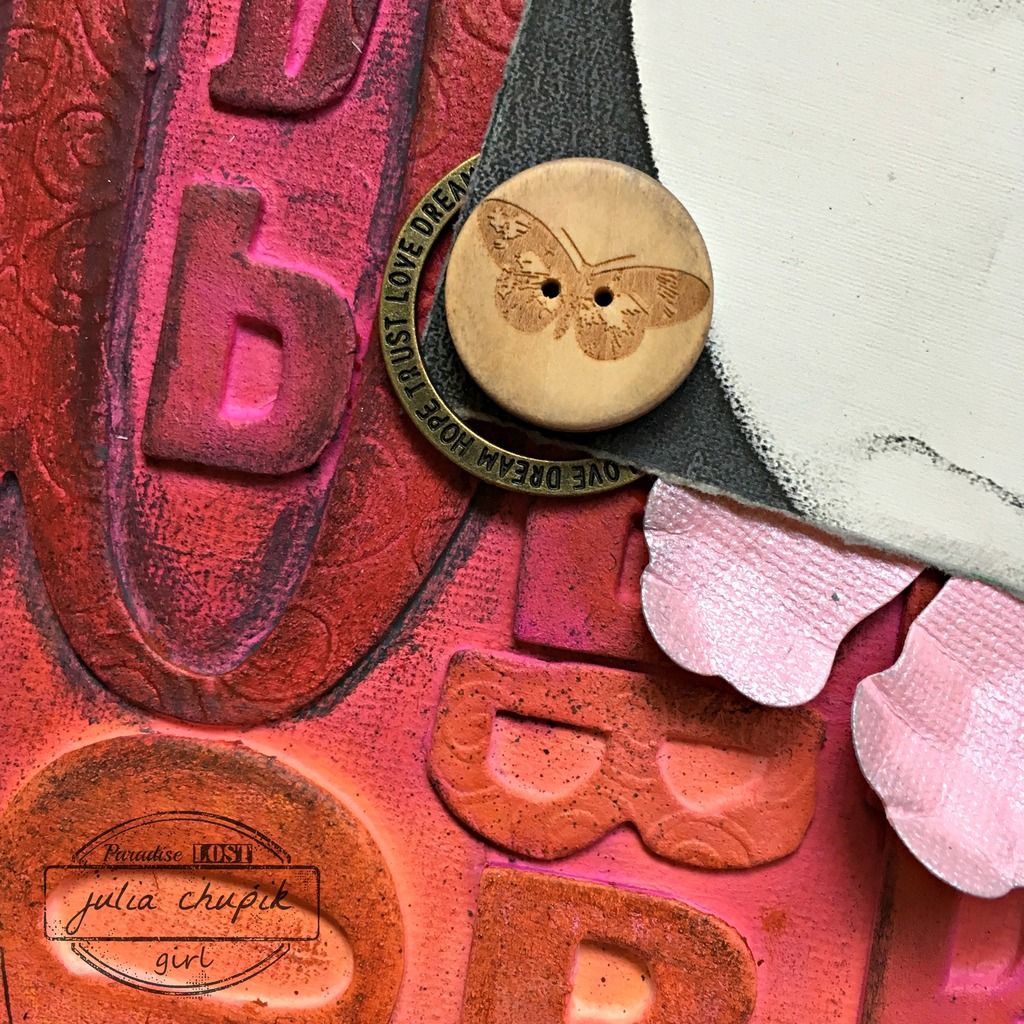
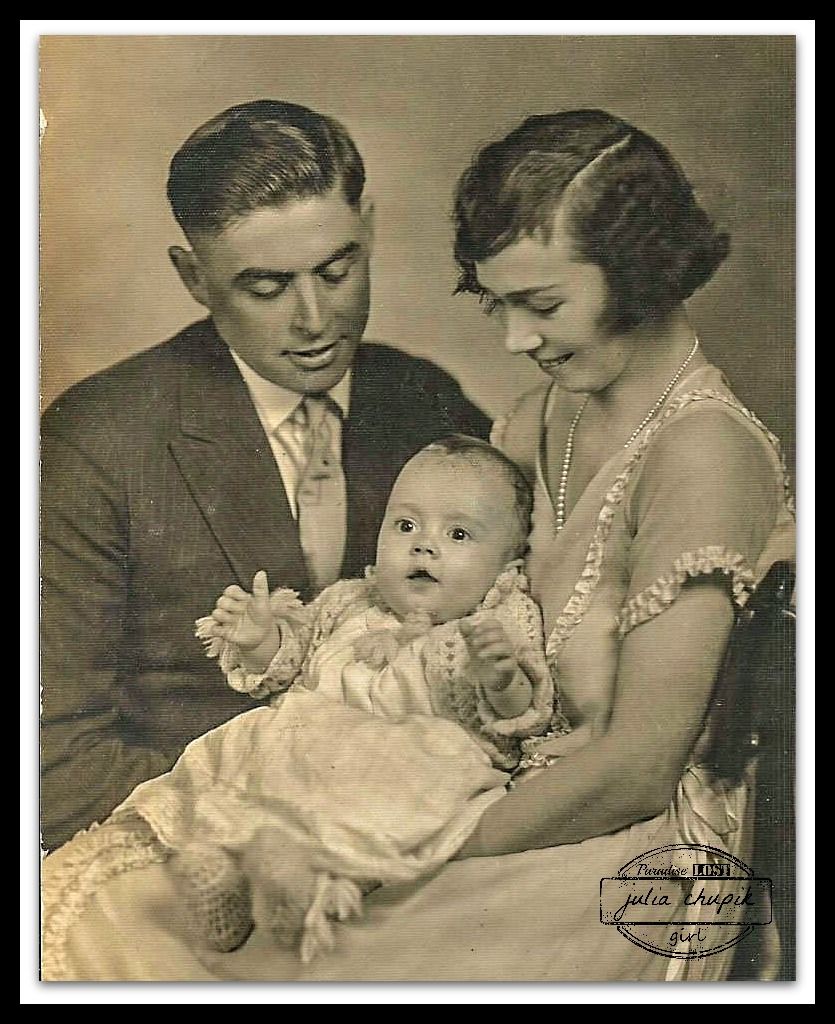
Found Relative card from Tim Holtz Idea-ology.

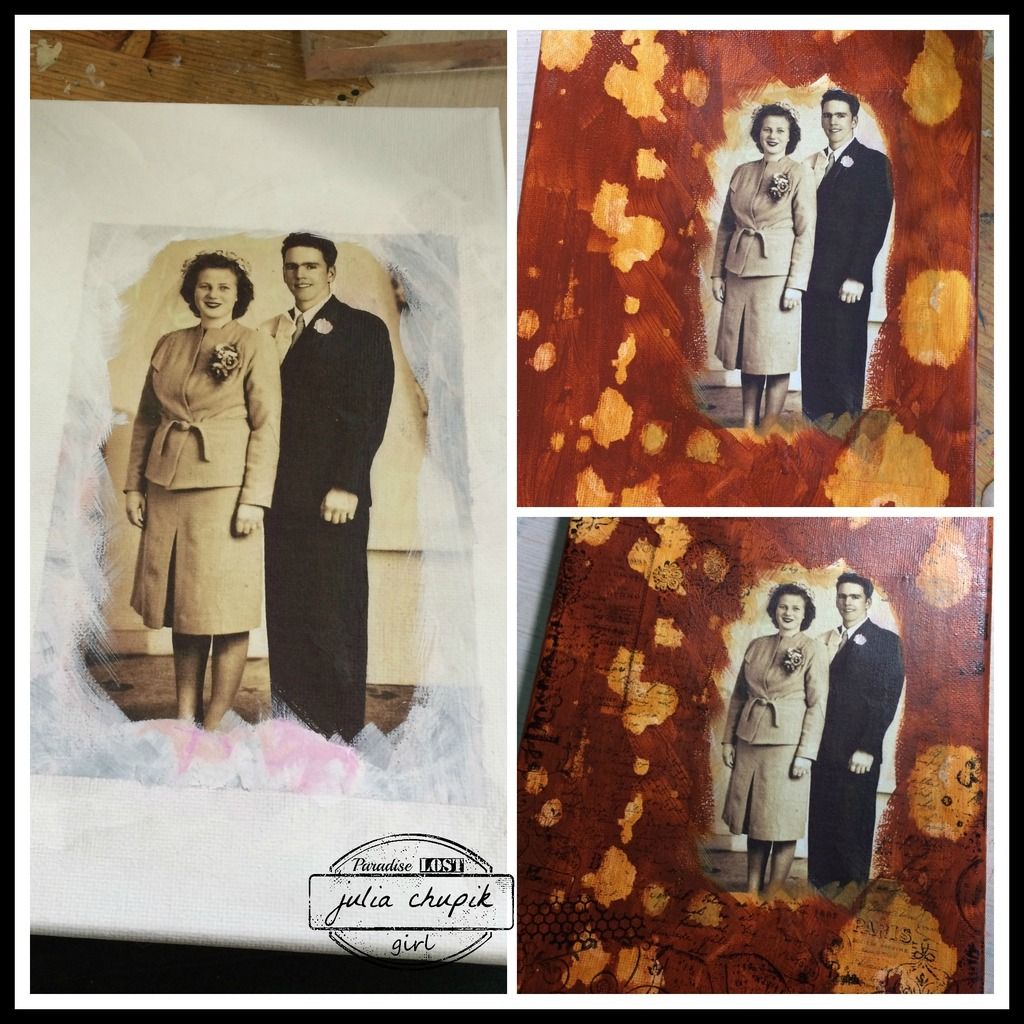
I started by trimming down one patterned paper down to 11.5"x11.5" to layer over a darker
12x12 pattern paper.

I used my Tim Holtz Distress Tool on the edges.

Next I sprayed some Prima Color Bloom (Worn Leather) randomly over the 
11.5"x11.5" pattern paper & I dried it with my heat gun.
I took the spray cap off the bottle of irRESISTible Ink (Danube Blue) and 
dripped it over the paper next.

I torn a page out of an old novel and used inks & stains to age it before
layering it under the distressed edge of the patterned paper.

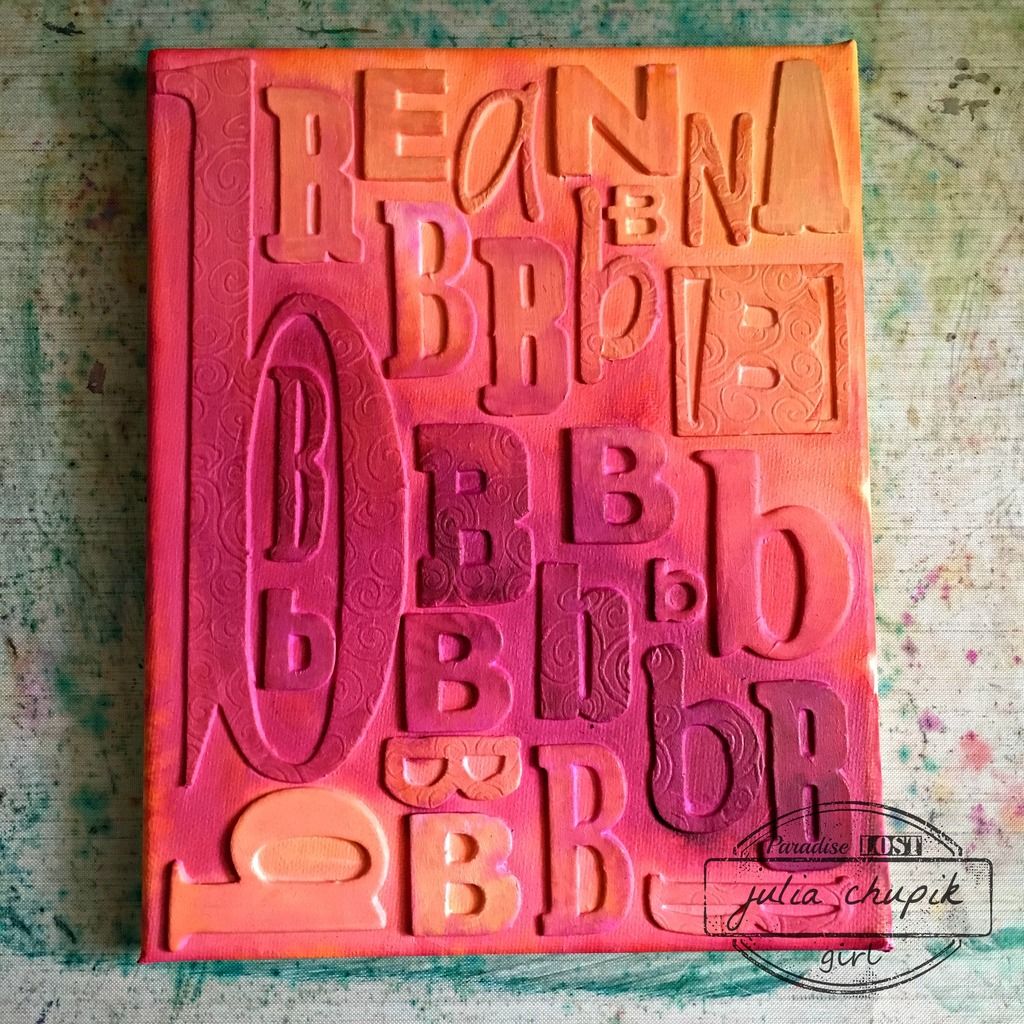
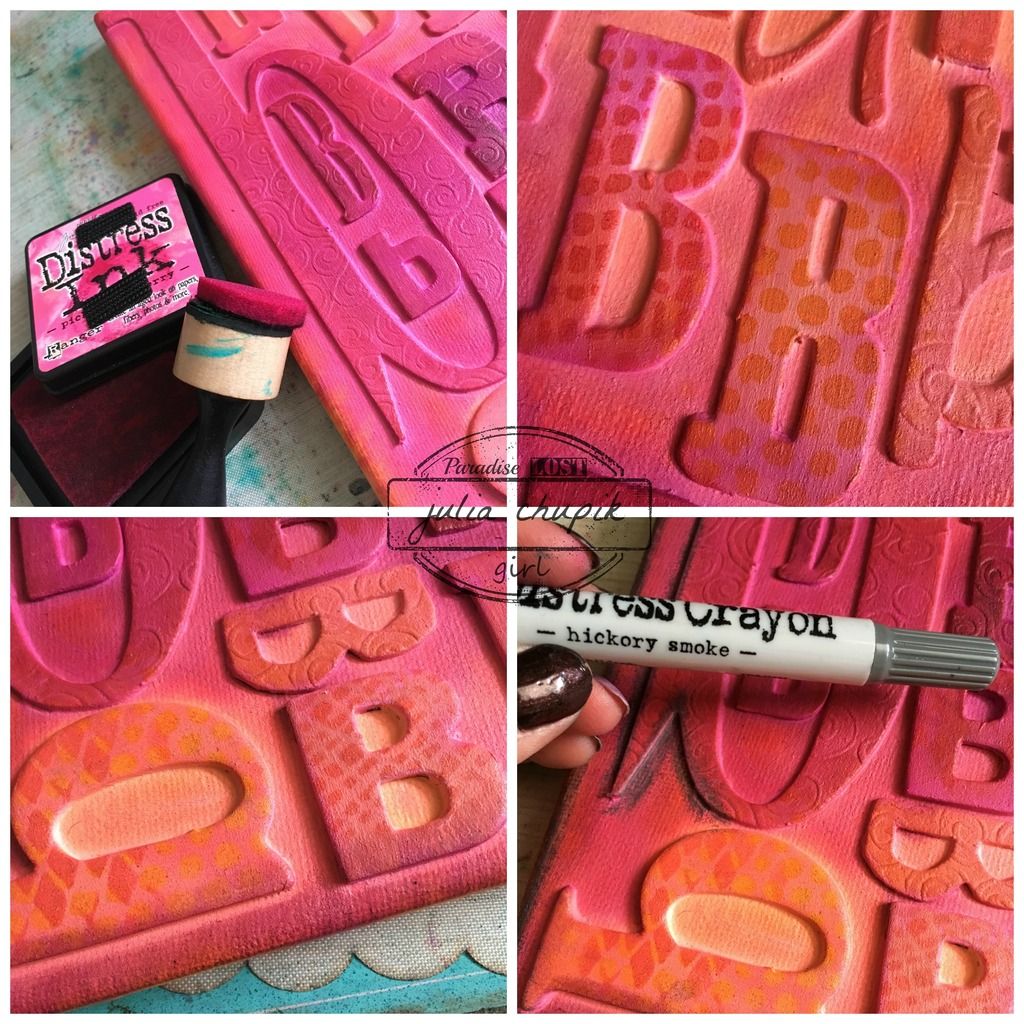
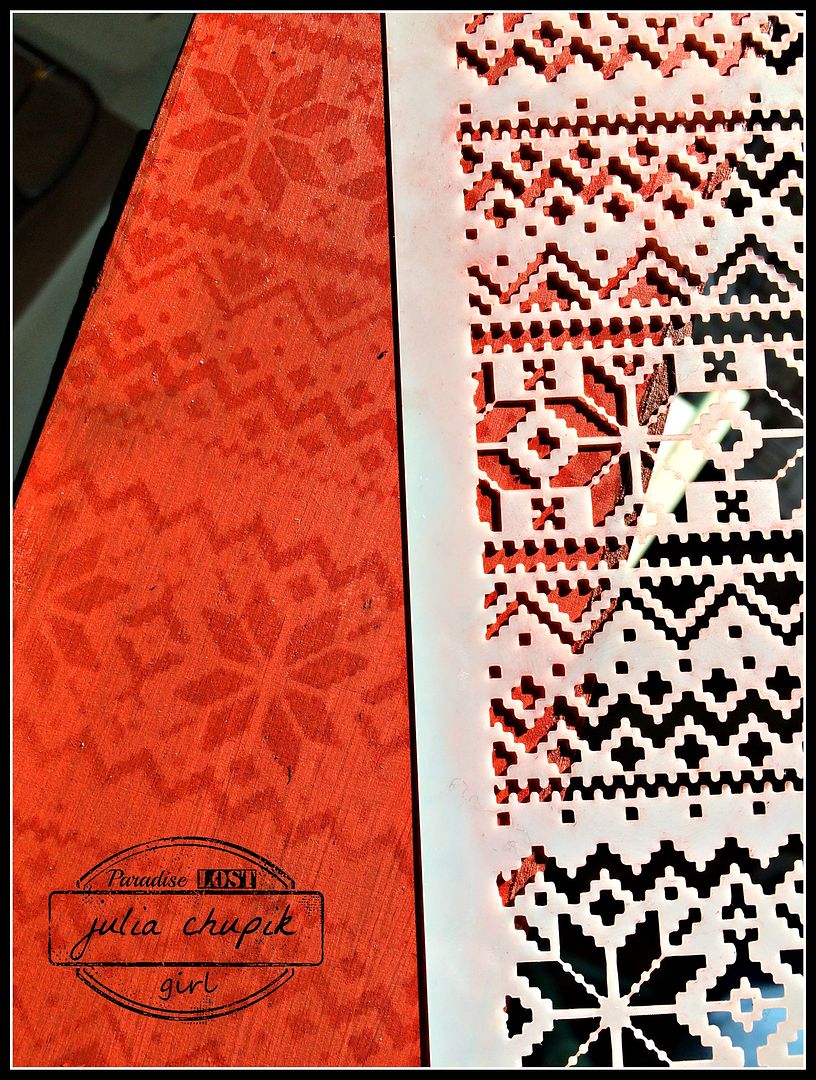
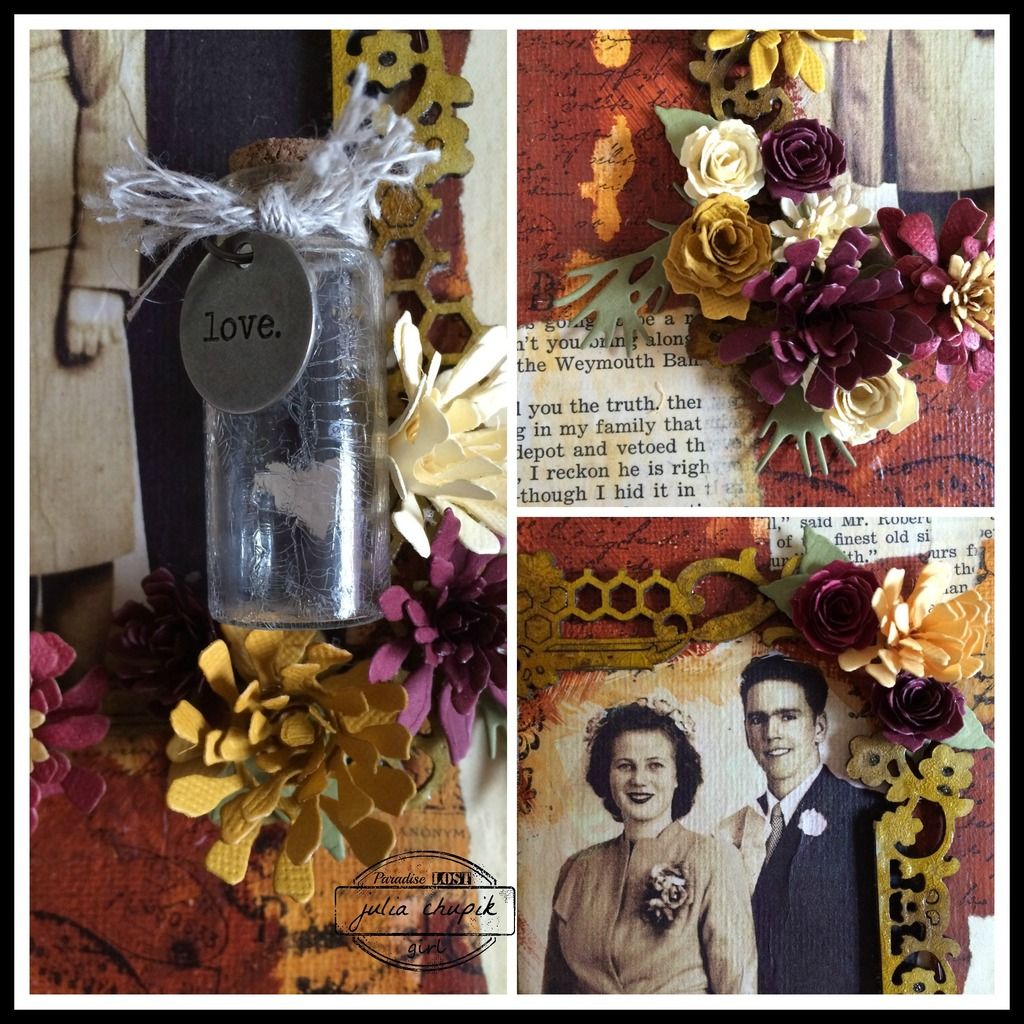
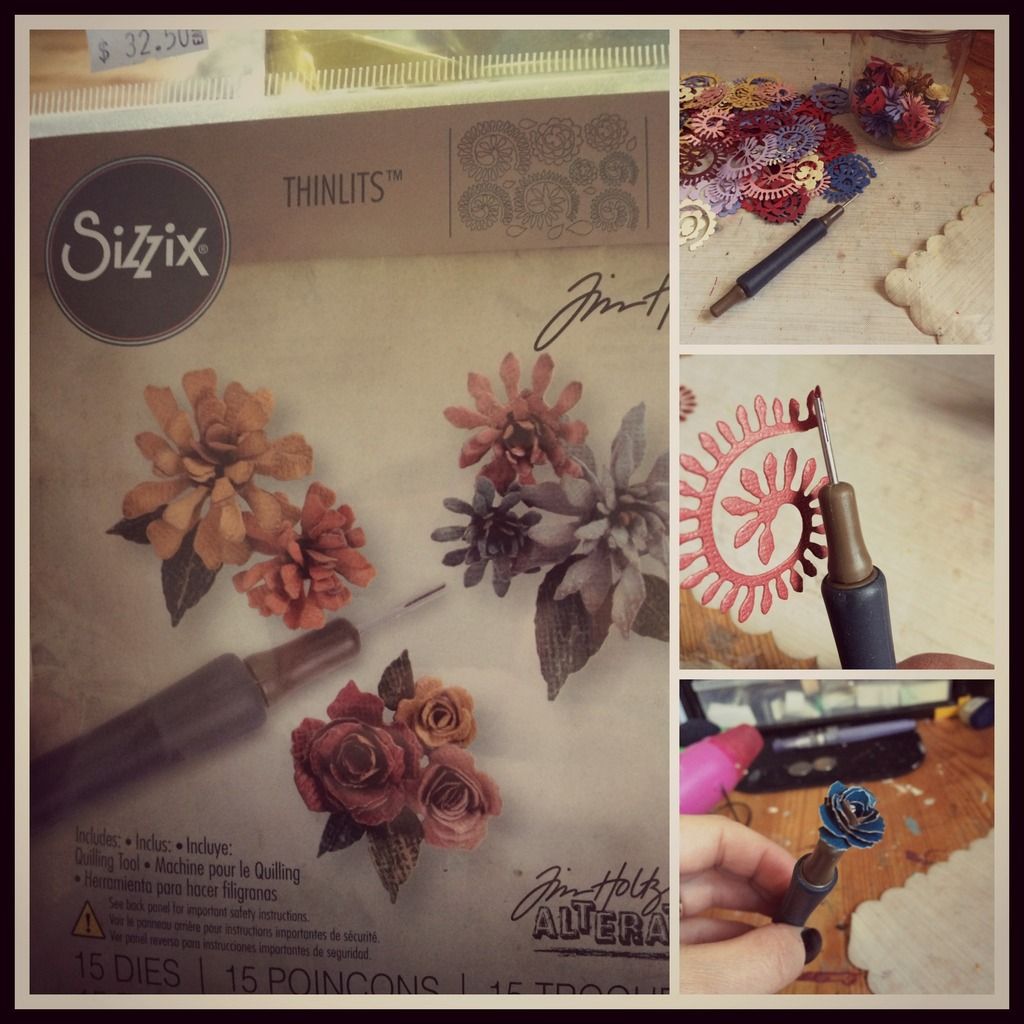
The chipboard from Southern Ridge Trading Co is amazing and can be altered by painting,
staining, spraying, ink. It can also be distressed by sanding. The photo on the left shows the chipboard after one layer of paint. The one on the right shows the chipboard after 2 coats of paint.

After the paint was completely dried, I took my sanding tool and roughed up 
the paint before adding some Ground Espresso Distess Ink with a blending tool.
The butterfly on the right was first sprayed with Prima Color Bloom
 (Summer Sky) then I stamped over it with a texture stamp &
Ground Espresso Distress Ink.


I distressed the Found Relative Card by sanding & inking it. I used the Tim Holtz 
Distress Tool on the edges then inked the edges with Ground Espresso Distress Ink 
and a blending tool. I then spritzed some ink over the card.

You can see this layout on display at The Scrap Shack in Ponoka, Alberta.


Thursday, 2 June 2016

All The B's - Being Beautiful Breanna

Hello! I'm back this week with an idea that I have had going
around in my head for some time. When I was cleaning/organizing/purging my
craft room a few months ago I realized that I had accumulated quite quite a lovely collection
of chipboard & grungeboard alphabets. It was time to start using these.

This is what I decided to do ~~~


I started with an 8x10 canvas and my collection of alphabets.
I first went through and spelled out my daughters name then pulled out all the B's.
I figured out the layout then using matte medium adhered them all down to the canvas. I then covered the entire canvas in the matte medium. I let this dry completely then applied 3 coats of white gesso.


I was finally ready to add my colours -
Dylusion's Sprays in Pure Sunshine, Squeezed Orange & Funky Fushia.
I love these colours together! So bright & sunny.

Next I added some Distress Ink in similiar colours just to help the letters pop a bit.
I also added some patterns using my layering stencils.
Lastly it was time to add a bit of grunge with my Hickory Smoke Distress Crayon along the edges and around the letters.

It was time for a few embellishments - 

I kept the embellishments pretty simple. 
Thanks to my craft bestie Nicole Wright for letting me browse her impressive die collection - thats where I found the new Rolled Flower Die from Sizzix by Eileen Hull.
I cut the die cut in half stapled it back together in the shape you see here and using the blunt end of a paint brush shaped the petals. Before adhering to my frame I added a bit of Hickory Smoke 
Distress Ink to the edges.


submitted to the following challenges:

Rhedd's Creative Spirit - June Challenge


Thursday, 26 November 2015

Christmas Sweater Inspired Advent Calendar - Festive Project for Emerald Creek Design Team

It's the end of November and my thoughts are turning to all things Christmas.
Cards & gift tags to make, gifts to wrap, meals to plan and all that decorating!
What better way to get into the holiday spirit than to make & decorate a 25 Day Advent Calendar.
Each box is like a tiny piece of art and I love how this one turned out.

I was initially inspired by this package of paper from Carta Bella called Warm & Cozy. Isn't is dreamy! Then I decided to combine it with an 8x8 pad of Yuletide from Tim Holtz.
These advent calendars are handmade - my dad builds the wood box out of MDF and then I make the smaller boxes from chipboard. I have bought the advent calendars available on the market in the past but these are so much more sturdy.
I painted the outside of the box with a mix of bright red and burnt sienna acrylic paint - at about a 2:1 ratio. I didn't mix the paints completely as I wanted the brown of the burnt sienna to be visible as streaks throughout the red.
Each smaller box was painted with Peeled Paint Distress Paint on the outside and a wash of burnt sienna on the inside.
I then used the Holiday Knit Layering Stencil from Tim Holtz and Fired Brick Distress Ink to apply the design on all sides of the MDF box.
I then glued squares of the paper on the front of each box as well as lined the back and bottom sides of the boxes on the inside.
Once I found enough handles & drawers pulls and other bits & bobs it was time to start decorating.

I used the Alphabet thinlit die from Tim Holtz/Sizzix and a sheet of gold adhesive backed deco sheets from Tim Holtz Idea-ology. 
 I traced around the numbers with my hickory smoke distress marker just to add a bit of shadow.


I was so excited to finally use my snowflake charms from Emerald Creek Supplies. These metal alloy charms are gorgeous! I used alcohol inks in various shades of brown to give them a vintagy look.
I also used a Buckle Charm for a drawer pull. It was the perfect size and looked great after I used alcohol inks to add some colour.
I know I have said it before but I am in love with the Exclusive Line of embossing powders from Emerald Creek Crafts. This time I used the Soft Fallen Snow. I first used it on the words Let It Snow. I just love the texture and the tiny flecks of sparkle is perfect.
 I also used the Soft Fallen Snow on the Stacked Snowflakes - I first covered them with Picket Fence Distress Crackle Paint and while it was still wet I sprinkled the embossing over it. I just love the look of it after the paint dried ans cracked. I finish it off I gently inked the edges of the snowflake with Vintage Photo Distress Ink.
I also used this embossing powder on a couple of scrap pieces of torn white cardstock.  This made a nice little 'snowdrift' for my Crazy Bird.

Here is my finished 25 day Advent Calendar - already to go for December 1st.


 For more Festive inspiration check out the projects from the rest of the Emerald Creek Design Team

Karon - Karon's Krafty Korner
Diana - missusgmoments
Cathy - Amethyst Dragonfly's Alcove 
Katelyn - A Creative Journey

Now that you are feeling festive head on over to the Emerald Creek Dares blog for the new Festive challenge. Share your Festive projects with us for a chance to win a $25 credit to the online store.

http://www.emeraldcreek.ca/


Thank you so much for dropping by my blog today!
I appreciate you taking the time and leaving a comment.

Friday, 21 August 2015

Elegant Edna.....my August Tim Tag

Is it August 21st already? My goodness, where does the time go?
I have to get my butt in gear before Tim blogs the September Tag!
I love the Friendship Words Block & Script Die sets - it took me a little time to get them positioned the way I wanted them and a little washi tape to hold everything in place. It seemed like a waste of washi but it was the only tape I had in the house. Desperate times call for for desperate measures!

 Meet Edna - an elegant lady from the Found Relatives collection.
I named her Edna after my very own great gram ~ a lady who could rock a stylish hat 
with the best of them.

 This tag is going to make a great gift tag for a friends upcoming birthday!
Be sure to check out Tim's Tag for August
Thanks for visiting my blog today!

Leave a comment so that I know that you were here. 
I love 'meeting' new crafty people that will inspire me!

~~ stay crafty ~~

julia
Submitted to challenge: 


Tuesday, 21 July 2015

a Venti Pike Place engagement.....

Engagements between two amazing people are always an exciting & wonderful time...and this one is very special because one half of this engaged couple is my little sister, Jessica.

Simon & Jess ~ Seattle June 2015


The other thing that made this engagement amazing is that Simon planned it as a surprise - everyone knew about it for a month before the actual event happened. I'm so very proud of myself for keeping my mouth shut even though I was absolutely bursting with excitement!

The happy couple met for the first time at a Starbucks in Calgary & the plan was to surprise her with a weekend getaway to Seattle & propose at the very first Starbucks at Pike Place Market. All though the actual "popping of the question" didn't happen there it was still very memorable and romantic. 

I knew as soon as I heard the plan of the engagement from Simon that I had to make a Starbucks themed card for them.

I bought this cool Starbucks stamp at Viva Las VegaStamps
 and knew that it would be perfect with the Fresh Brewed Die from Tim Holtz & Sizzix.


I little burlap & die cut words from the Friendship Script thinlits die set finished it off perfectly.


Thank you so much for visiting my blog today.

I love reading your comments & checking out your blogs!

stay crafty

~~~julia~~~


challenges entered:

Viva Las VegaStamps: July ~ a bit o'vintage
  

Friday, 15 May 2015

A Vintage Canvas

My Great-Grandma Edna was a grand lady. Full of life and a hearty laugh that would
 bring a smile to anyone's face. I give her full credit for passing on the 
scrapbook gene to me.
My great-gram with her husband Septimus & holding my grandfather - circa 1925
I recently inherited her scrapbooks (dating from the 1920's - 1970's), her mother's scrapbook (dating back to the 1870's) and my great-grandfathers scrapbook (dating from 1910-1920's) 
It has been quite a journey going through these old family photos & it has also been quite inspiring.

I recenyl started a series of canvases that will displayed in my home using copies of some of my favorites. This is one of them.....

This is a photo of my Grandpa & Grandma Shuttleworth on their wedding day in 1946. After editing the photo I printed it out on white tissue paper. I then used matte medium to adher it to an 8x10 canvas. I applied a light coat of gesso arounf the edges before starting to layer my paint. My next step was to stamp various images across the canvas. 
After adding some torn paper pieces to the canvas I started adding my 3D elements. The Foral Medley Frame from Blue Fern Studios was perfect and I couldnt wait to use my new Fossilized Amber Distress Stain on it. I finshed the frame off with a coat of Distress Clear Rock Candy paint for a little more added texture. Check out those Tiny Tattered Florals! It's my new favorite die!
I sat down earlier in the week & made a whole mason jar full of these tiny flowers! The quilling tool that comes with the dies really makes these flowers easy to assemble. 
Check out this demo video by Tim from CHA 2015.....

Finally here is my completed canvas.....
.....all ready to display with my other family canvases.
Check out A Vintage Journey Challenge Blog
for a lot of Tim-Inspired Shabby & Vintage goodness!


Thank for visiting my blog today! I really appreciate all your comments.

~~ stay crafty ~~
julia


Challenge Entry....
A Vintage Journey

Submitted for:

Emerald Creek Dares - Fall 2015 DT Call