Showing posts with label layering stencils. Show all posts

Monday, 16 October 2017

A Gentle Heart Art Journal Page

Welcome my friend! I am so glad you decided to visit today.
I would like to share an art journal page that I created using some new stamps from 
Viva Las VegaStamps.

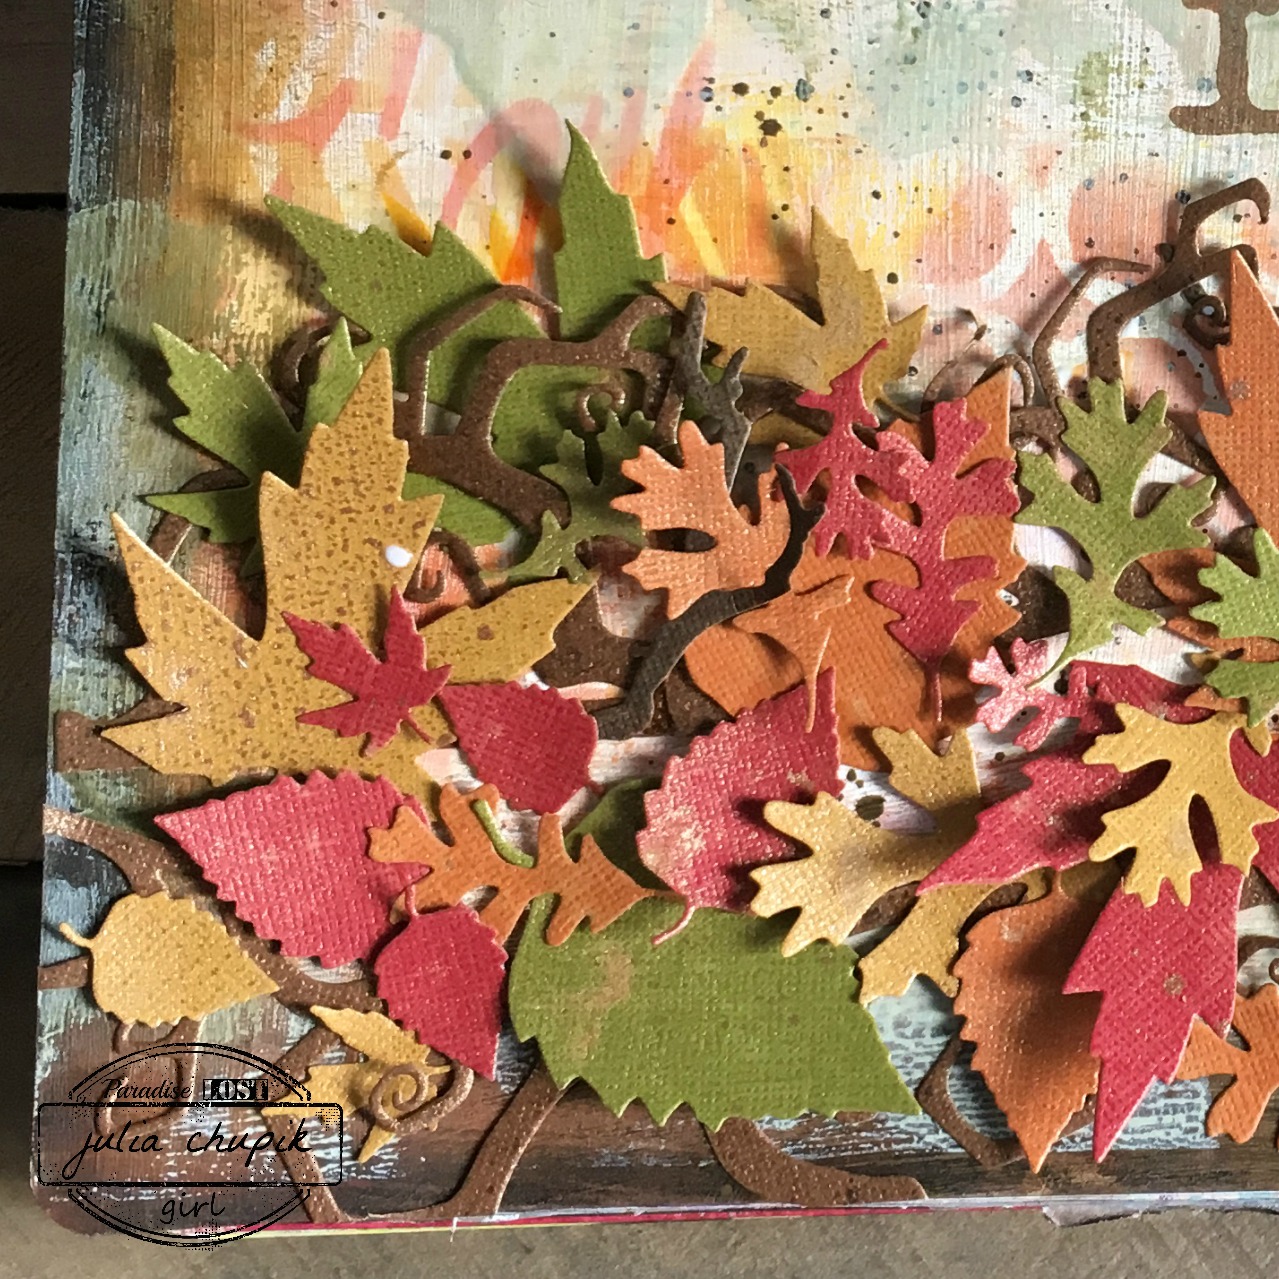
I started with a page spread in my calculus journal. These pages had already had a light coat of gesso applied. First I took the Tim Holtz Ornate Layering Stencil and pressed my Fossilized Amber Distress Oxide ink pad over it, sprayed it with a bit of water then pressed it to my page. I repeated this step with Wilted Violet Distress Oxide Ink. I also added some additional stamping in the corners with some texture stamps & Archival Inks in Potting Soil & Fern Green.


I stamped my images on cold press water colour paper with Archival Ink - Jet Black. I used my Tim Holtz Stamp Platform to get the best stamped images. 

Once I had them stamped I used my Distress Markers to colour them in. I fussy cut them out and adhered them to my pages.

I used a piece of black thread for the balloon string and added the shadow to the girl with my Hickory Smoke Distress Marker.

Products Used:


Monday, 9 October 2017

Happy Fall Art Journal

Happy Thanksgiving to all my Canadian friends wherever you may be in the world.

This will be a short post today.....an art journal page I did in my large Dylusions journal.

Here are the steps I used to create this page:
1. Brayered on acrylic paints in orange & yellow; random and didn't cover then entire page
2. Dry brushed on a light coat of gesso; let dry
3. Applied Distress Inks - Squeezed Lemonade, Carved Pumpkin & Ripe Persimmon through stencils
4. Around the edge of my page, I scribbled Distress Crayons - Walnut Stain & Black Soot and smudged them with my fingers.
5. Brayered on 2 different colors of green acrylic paint randomly over the page; let dry
6. While may page was drying I used my Fall Foliage and Twisted Edge dies from Tim Holtz/Sizzix and cut out some shapes with various colors of Distress Kraft Cardstock
7. I sprayed all of my die cuts with a light listing of Distress Mica Spray - Antiqued Bronze
8. I glued down all my die cuts along the bottom of the page 
9. I used the Tim Holtz Foam Cling Stamp - Type Lower, to stamp my sentiment.

Below are the affiliate links for the products used for this project.

Thursday, 4 May 2017

My Paper Doll Family

Hello & welcome back!

I'm here to share yet another Etc tag. I love these! LOVE!


Here is one I made using the medium size tag -
click on the photo to see more details and close-up photos.


The tag I have to share with you today is using the large Etcetera Tag.
The first thing I did was paint my tag with white gesso then set it aside while I 
worked on my focal point piece.


I started with a Tim Holtz Idea-ology Cabinet Card frame. I carefully opened it up and removed the front frame part from the back.

I used the smoosh technique to add some Distress Oxides ink to the inside of the back piece.
(not shown in photo - I smooshed the front frame into the left over ink to add some splotches to it)

Then used some Distress Ink & the Ornate Layering stencil with the stencil monoprint technique to add some interest over the Distress Oxide.

I added my Paper Doll parents to the background with some foam dots then added the frame
 with 2 layers of foam tape. To finish off the edges of my frame I cut strips off the packaging insert from a layering stencil and adhered them with tacky tape.


The gesso is now dry on the tag so its time to start adding my paint. I chose to use Pomegranate Seed & Black Marble Dylusions Paint for this. First I applied the Pomegranate Seed with a
dry brush. I then applied the black with a brayer. Once the paint was dry I used a sanding
block to distress the edges a bit.

Taking the same Ornate Stencil that I used on my cabinet card frame, I applied the some Picket Fence Distress Ink in a few spots on the tag. I also added some script stamping with black Archival Ink.

My next step was to mix some Distress grit paste with some Peeled Paint Distress Oxide.
I applied this through the Floral Layering Stencil on to the tag. Once the green grit paste dried I decided to add another layer of grit paste in a contrasting colour - this was Worn Lipstick Distress Oxide ink.

I assembled my focal point with my 3D cabinet card frame and various pieces of ephemera from my stash. 

I still wasn't happy with the edge of my cabinet card frame so I added some 
jute twine with a bit of hot glue. 

I used a couple of metal embellishments that I found in stash to cover the hole in the tag.

My finished tag - 

Wednesday, 12 April 2017

Stencil Monoprint Technique

Hello my crafty friends!
I'm here to share a card I made using a pretty simple technique for the background - stencil monoprint. It's one of my favourite techniques and I use it for cards, scrapbook pages and in my art journal. Here is a close up of the background.

I started with a 6"x 6" piece of Superstock from Creative Scrapbooker Magazine. My friend, Nicole, insisted I give it a try since I love mixed media. I had my doubts since I have tried many smooth heavy cardsock before and wasn't thrilled with the results. This Superstock is amazing! It can take a lot of abuse from wet media and still look smooth. I'm definitely a Superstock convert.

I took a couple of my Distress Oxides ink pads - Fossilized Amber & Fired Brick, and swiped them diagonally across a Tim Holtz Layering Stencil - Coundown, from Stampers Anonymous. I was careful not overlap the colours so as to not contaminate my ink pads.

After a few sprays of water over the ink I took a paper towel and wiped off the ink from the sides of the stencil. I didn't want to see any hard edges on my background.

Now its time for the magic - I flipped my stencil over on to the Superstock, and pressed it down lightly with a roll of papertowel. I let the stencil sit on the Superstock for about 20 seconds before removing it. I love how this background turned out. I took my spray bottle and gave the ink a quick spritz before drying with my heat tool.

My background is done and now it is time to work on my stamped images.
Thanks to my Misti & Versafine Onyx Black ink I get some beautifully crisp stamped images. I love my Misti. I stamped a Crazy Cat, a few balloons from the Crazy Accessories set and a Happy Birthday sentiment.  I used my Distress Ink and water brush to colour in my images. Then I diecut them out with the matching dies from Sizzix. 

I used dimensional foam to adhere them down to my background.


Here is my finished card. 


Friday, 24 March 2017

Creativity......an art journal page

Welcome back! 
I am still on a roll with creating pages in my calculus textbook art journal.

This page is full of colours and layers. I created while away at a 4-day retreat and the 
Silhouette Script stencil from Crafters Workshop and the Tim Holtz Motivation stamp from Stampers Anonymous I used were borrowed from another crafter.

I started by dry brushing some gesso over the pages and letting it dry. The first 3 paint colours were applied with a brayer. I then added some contrasting colours with a few different stencils & some random stamping with archival ink.

I stamped the sentiment on some tissue paper with black Archival Ink before applying with some matte medium. I used paint to stencil a chevron pattern over the edges of the tissue paper to help it blend into the background.

I used black Dylusions paint for the 6x6 Silhouette Script stencil.

This was pretty fun to create and I love all the bright colours and how they layered together.


Tuesday, 28 February 2017

Garth Brooks - 2 page layout

Hello & welcome to my blog!

I have a 2-page layout to share with you today. I was lucky enough to see
Garth Brooks at one of his 9 concerts he had in Edmonton, Alberta this month.
It was amazing and I knew I had to scrapbook it asap.


I found these great pattern papers at Treasured Memories in Edmonton and knew they would be perfect. Treasured Memories has an exclusive line of pattern papers that they manufacture and these are from that collection.


I started by mixing some Distress Grit-Paste with some black gesso. Then I applied this through the Tim Holtz bubble mini layering stencil. After this dried I added some stamping & paint splatters. I took my ink blending tool and applied some black Dylusions paint to the edge of the paper.

My layered focal point was made with some old sheet music, twine, stickers and paper scraps that I had in my stash.


The second page of my 2-page layout was created with pretty much the same techniques as I used on page 1 except there are more photos.


I love how these pages turned out and they will be a great way to remember
our amazing evening with Garth.


Monday, 6 February 2017

Wanderlust 2017 - January Challenge

Hello my crafty people!

I am one month in to Wanderlust 2017 and I could not possibly be enjoying it more!
The teachers & classes have been incredibly inspiring and have really helped me be creative
 in some new and wonderful ways.

January's challenge for Wanderlust students was to go outside and choose 3 colours from natures palette to create a journal page that tells a story of your life in January. 

We live near a park that has a pretty good hill on one side of it. It's a really popular tobogganing hill for the kids in our neighborhood. On the day I read the challenge for Janaury, I took my dog for a walk and we went by this hill. It was a nice day, chilly but there was a bright blue sky and there were lots of kids out there. On either side of the hill are clusters of evergreen trees.
I decided that my colours were going to be blues & greens.
It just so happened that I already had a page in my art journal that had blue & greens on it from cleaning up some spray stains from another project. To tine down the colours I dry brushed some gesso over both pages.

I found some pages in an old book that I had that were perfect! After I decided the placement I glued these down with matte medium. To help blend the book pages in to the background I whitewashed them with a bit of gesso.

Next I added some evergreen trees with some Distress Paint - Pine Needles & Cracked Pistachio and The Woodland mini layering stencil from Tim Holtz.

Next, I added some more images using the Snowflake & Speckles Layering Stencils with some White Linen Dylusions Paint. The last step was taking my Distress Crayons and adding some grey, white & black to the edges of my pages and stamping my sentiment.